Contrary to popular belief, you don’t need a fortune in flowers to create a jaw-dropping garden effect; you need to think like a theatrical designer.
- Foliage walls and strategic uplighting deliver greater visual impact for a fraction of the cost of flower-heavy designs.
- Understanding the hidden weight of water and professional rigging techniques is non-negotiable for safe and impressive suspended installations.
Recommendation: Shift your budget from covering every table with flowers to creating a few large-scale, structurally sound focal points that manipulate perception and immerse your guests.
For any charity event organiser, the brief is a familiar challenge: create a breathtaking, unforgettable experience that feels lavish, all while adhering to a budget that is anything but. The dream of transforming a sterile hotel ballroom into a lush, secret garden often feels impossible when faced with florist quotes that could swallow your entire fundraising goal. The common advice revolves around simple tricks: use more greenery, choose seasonal blooms, or perhaps try a few DIY centrepieces. While well-intentioned, these tips barely scratch the surface of creating a truly immersive environment.
The problem isn’t the cost of flowers; it’s the approach. A theatrical set designer doesn’t fill a stage with expensive props; they use scale, light, and illusion to create a world. This is the perspective we will adopt. The key to a high-impact, low-cost transformation lies not in floristry alone, but in mastering the principles of structural engineering, lighting design, and logistical planning. It’s about understanding the physics of a hanging installation before you even choose a bloom, and knowing how to use light as a material to paint the walls with botanical textures.
This guide moves beyond generic advice. We will deconstruct the process with the precision of a West End production, focusing on the formulas, safety protocols, and design strategies that deliver the greatest perceived volume for your investment. We will explore how to calculate the true weight of your designs, how to safely rig them, and how to make every stem and leaf work twice as hard through the magic of strategic lighting. Forget simply decorating a room; we are about to set a stage.
To navigate this transformation, this guide breaks down the core professional techniques into manageable, strategic steps. The following sections provide a roadmap, from calculating your initial needs to the final, dramatic reveal.
Summary: A Theatrical Designer’s Guide to Budget Ballroom Gardens
- How Many Stems Do You Actually Need for 20 Tables: The Florist’s Formula?
- Why Foliage Walls Cost 60% Less Than Flower Walls but Look Just as Impressive?
- The Ceiling Hook Load Test That Prevents a £3,000 Installation From Crashing
- How to Keep a 12-Hour Gala’s Flowers Fresh From Setup to Midnight?
- Why Your Floral Installation Falls Flat Without Proper Uplighting?
- Why Floral Foam Alternatives Are Better for Structured Grid Arrangements?
- Why a 2m Floral Cloud Weighs 50kg: The Hidden Water Weight Factor?
- How to Hang a Floral Cloud From a Venue Ceiling Without Structural Damage?
How Many Stems Do You Actually Need for 20 Tables: The Florist’s Formula?
The first instinct when planning for 20 tables is to calculate the cost of 20 identical centrepieces. This is often the first and most costly mistake. A theatrical approach reallocates resources for maximum drama. Instead of a uniform, diluted effect, you create a dynamic landscape with areas of visual rest and intense focus. The goal is to guide your guests’ eyes and create memorable moments, not to simply decorate furniture. This is achieved through a strategy of environmental reallocation, where you intentionally simplify some areas to fund spectacular focal points elsewhere.
The secret lies in a formula that balances hero flowers, fillers, and greenery to create perceived value. For standard centrepieces, a 35:40:25 ratio (focal:filler:greenery) is a reliable starting point. However, the real budget-saving genius is to reduce the number of complex table arrangements. By creating 15 simpler arrangements and redirecting the saved budget and stems into three magnificent, large-scale installations at the entrance, bar, or stage, you create a far more powerful and memorable impression. This strategy also requires a contingency; always order 15-20% extra stems to account for inevitable breakage and wilting during transport and setup.
Action Plan: The Professional Stem Count Formula
- Define Ratios: For each arrangement, apply the 35:40:25 ratio: 35% focal flowers (e.g., roses), 40% filler flowers, and 25% greenery to maximise volume.
- Calculate Per Table: Use 20-30 stems for medium centrepieces. For a lush look, aim for 80-100 stems, but adjust based on your visual density goal.
- Reallocate Resources: Instead of 20 identical centrepieces, create 15 simpler ones (15-20 stems each) and redirect the saved budget to 3-5 large statement pieces (150-200 stems each) at key focal points.
- Add Contingency: Calculate your total stem count and then order an additional 15-20% to cover breakage, wilting, and last-minute needs.
- Final Tally: For a 20-table event aiming for mid-range impact, a budget of approximately 1,200-1,500 stems is a realistic target using this strategic reallocation method.
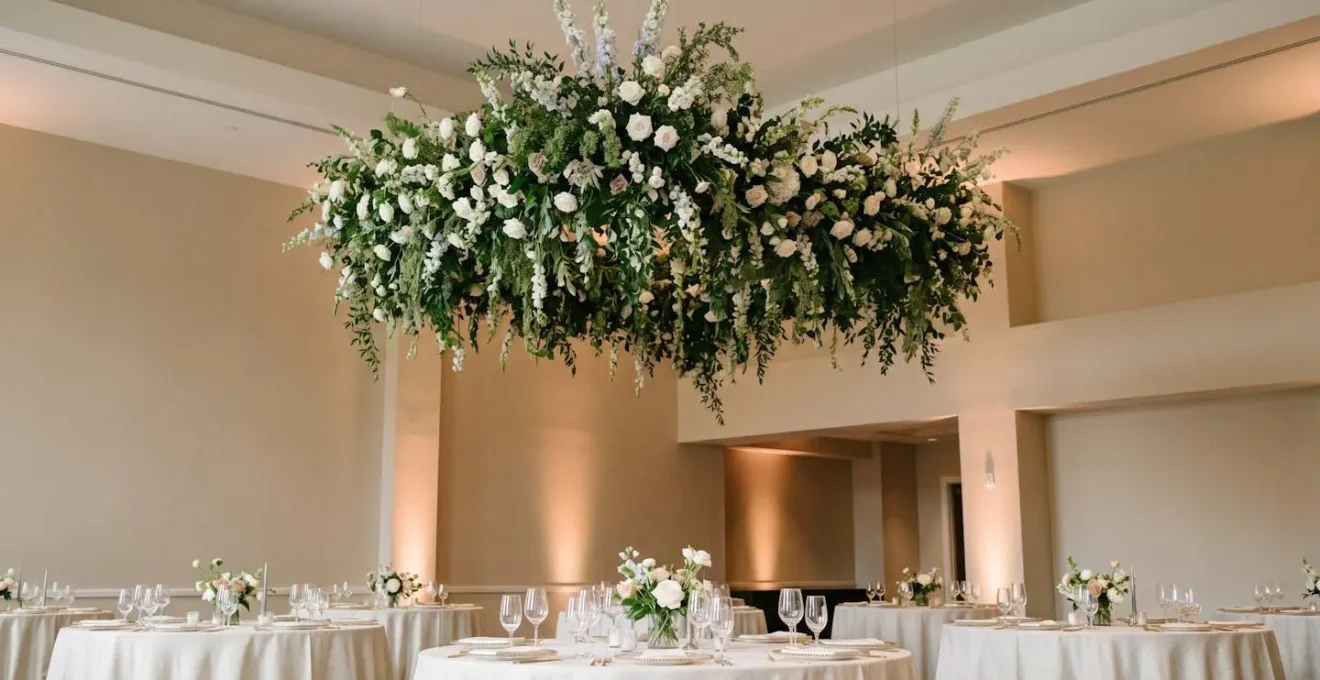
Why Foliage Walls Cost 60% Less Than Flower Walls but Look Just as Impressive?
A wall covered entirely in fresh flowers is the definition of luxury, but it’s a budget-killer. A foliage-forward wall, however, offers a comparable « wow » factor by trading high cost for high texture and volume. The reason for its efficiency is simple economics and visual psychology. Foliage is inherently less expensive and covers more surface area per stem than a delicate flower. More importantly, a well-designed foliage wall creates a deep, three-dimensional tapestry that draws the eye in. It’s not a flat backdrop; it’s a living sculpture.
According to industry pricing data, standard foliage walls can cost as little as $5-$7 per square foot, whereas flower walls soar to $125-$175 for the same area. The key to making foliage look luxurious is textural variety. By mixing 5 or more types of greenery—like the feathery fronds of asparagus fern, the broad leaves of monstera, and the silvery discs of eucalyptus—you create layers of light and shadow. This depth gives the installation a perceived value far beyond its actual cost. You can then strategically insert small pockets of flowers at key focal points, turning them into precious jewels set against a rich green velvet.
As the image above illustrates, the interplay between different leaf shapes, sheens, and shades is what creates a truly captivating and high-end look. It’s this deep, tactile quality that makes the installation feel immersive.
Case Study: The High-Impact, Low-Cost Foliage Wall
A documented case study showed a DIY enthusiast creating a 4×6 ft foliage-dominant wall for under $100 using artificial greenery. The project used simple grid panels as a foundation, mixed over five types of greenery for textural depth, and strategically placed small flower pockets. Compared to an estimated $500+ for a fresh flower equivalent, this reusable installation demonstrated the immense cost-effectiveness and visual power of a foliage-first design approach.
The Ceiling Hook Load Test That Prevents a £3,000 Installation From Crashing
Suspending a floral installation is the fastest way to create a show-stopping moment, but it’s also where amateur design can turn into a costly disaster. The single most critical step is not design, but engineering: the load test. Before a single stem is hung, you must have absolute certainty about the structural integrity of the rigging point. This isn’t something to guess. You must request written documentation from the venue detailing the certified dynamic load capacity of their rigging points, ideally signed by a structural engineer. While major convention center rigging guidelines specify capacities around 1,000 lbs per heavy load point, every venue is different and verification is non-negotiable.
The core of a safe installation is a practical stress test. This involves hanging sandbags or water containers equivalent to 125% of your calculated maximum « wet weight » from the hook for a minimum of 30 minutes. During this time, you must monitor for any sign of structural strain—creaking, movement, or deflection. For any installation over 25kg, professionals use spreader bars to distribute the load across multiple points, drastically reducing the stress on any single anchor. Finally, redundancy is your best insurance policy. A secondary safety chain or steel cable, attached to a separate anchor point, is a mandatory fail-safe for any object hung over an area where guests will be present.
Checklist: Venue Rigging & Load Capacity Audit
- Obtain Ratings: Request written documentation from the venue showing the certified dynamic load capacity of all rigging points, signed by a structural engineer.
- Calculate Wet Weight: Use the formula: Final Weight = Dry Structure + Dry Foliage + Total Water Volume (in Litres). Add a 20% safety margin.
- Conduct Stress Test: Hang sandbags or water containers equivalent to 125% of the calculated maximum weight from the hook for at least 30 minutes, monitoring for any structural strain.
- Implement Redundancy: Attach secondary safety chains or steel cables to a separate anchor point as a fail-safe backup for all overhead equipment.
- Distribute Weight: For installations over 25kg, use spreader bars to distribute the load across 2-3 ceiling points, reducing individual point stress.
How to Keep a 12-Hour Gala’s Flowers Fresh From Setup to Midnight?
An installation that looks stunning at 6 PM but is wilting by 9 PM is a failed investment. For a long gala, ensuring floral freshness is an exercise in meticulous hydration logistics. The process begins 24 hours before the event. Stems must be cut under water at a 45-degree angle, stripped of all foliage below the waterline, and immediately placed in clean buckets with a flower preservative. This first drink is the most important. Next comes the conditioning phase: storing the stems in a cool, dark location (a cooler or refrigerator at 34-38°F) for at least 12 hours. This slows their metabolism and allows them to hydrate fully.
The « hardening » phase is equally crucial. About 12 hours before installation, the conditioned flowers are moved to a room-temperature environment to acclimate. This prevents the thermal shock that can cause sudden wilting when they are moved into the warm ballroom. During installation, every part of the design must have a hidden water source—floral tubes for individual stems in a cloud, small water dishes concealed in foliage at the base of an arch, or soaked foam wrapped in plastic. The timing is also staged: hardy elements like eucalyptus and roses can be installed 6-8 hours out, but delicate blooms like hydrangeas must be held in a cool staging area until the last possible hour.
For ultimate longevity, especially with greenery, professionals use a glycerine preservation technique. As detailed in floristry resources, a solution of one part glycerine to two parts warm water can be used to pre-treat foliage. The plant absorbs the glycerine, which replaces the water in its tissues, effectively preserving its supple appearance for days without a direct water source. This is a game-changer for large-scale foliage installations intended to last through a long evening.
Why Your Floral Installation Falls Flat Without Proper Uplighting?
You can spend your entire £5,000 budget on the most beautiful floral structures, but if they are sitting in a flatly lit ballroom, their impact will be halved. Lighting is not an accessory; it is a material that sculpts space and multiplies the value of your physical decor. As event design professionals emphasize, lighting is one of the most underrated yet transformative elements. It turns a simple foliage wall into a dramatic art piece and a ceiling installation into a mystical canopy. For a budget-conscious event, lighting delivers the highest return on investment for creating an immersive atmosphere.
The most effective technique is shadow play. By positioning uplighters a few feet away from your foliage walls and angling them upwards, you can cast dramatic, oversized shadows of leaves and branches onto the walls and ceiling. This simple trick can visually double or even triple the perceived size of your installation, making the entire room feel like part of the garden. Color temperature also plays a psychological role: warm-toned light (~2700K) creates a romantic, candle-lit mood, while cool-toned light (~4000K) makes greens and whites appear crisp and modern. A more advanced technique involves using gobos (light stencils) to project soft, out-of-focus leaf patterns onto the dance floor or ceiling, fully enveloping the guests in your garden illusion.
Finally, consider the theatrical « reveal. » Keep your main installations dimly lit as guests arrive. Then, at a key moment—a toast, an awards announcement—bring the lights up to their full, dramatic glory. This coordinated reveal creates a gasp-worthy moment that will be remembered long after the event is over.
Why Floral Foam Alternatives Are Better for Structured Grid Arrangements?
For decades, green floral foam has been the default mechanic for creating arrangements. However, it is a single-use plastic that crumbles into microplastic pollution and offers limited creative flexibility. For a modern, budget-savvy, and environmentally-conscious designer, the alternatives are not just « greener »—they are often superior for creating structured, architectural designs. Moving away from foam encourages a more intentional style of floristry, where stem placement is a deliberate artistic choice rather than a matter of packing a block tightly.
Mechanical systems like a simple grid of chicken wire (or floral netting) tucked into a vase or urn provide a flexible, reusable framework. This allows for airy, natural-looking arrangements where stems can be placed and repositioned with ease. For minimalist table designs, the Japanese Kenzan (pin frog) is an infinitely reusable tool that holds stems securely at precise angles. These methods often lead to using fewer stems more effectively, as the structure itself becomes part of the design’s integrity. For large suspended installations, a system of individual water vials attached to a wire framework provides direct hydration without the immense water-logged weight of foam bricks.
This shift towards sustainable mechanics offers a dual benefit of environmental responsibility and design sophistication, as confirmed by recent analyses of floristry trends. The table below compares the most common alternatives.
| Method | Water Retention | Stem Security | Reusability | Best Application | Environmental Impact |
|---|---|---|---|---|---|
| Chicken Wire Grid | Moderate (requires water dishes) | Good for flexible placement | Highly reusable | Natural, airy arrangements; adjustable designs | Low – metal recyclable, zero waste |
| Kenzan (Flower Frog) | Excellent (used with water dish) | Excellent for thick stems | Infinitely reusable | Minimalist table centerpieces; architectural designs | Very Low – one-time purchase, lifetime use |
| Agra-Wool/Biodegradable Foam | Superior long-duration | Superior for woody stems | Single-use but biodegradable | Large structures requiring secure hold | Moderate – biodegradable but still disposable |
| Water Vial Grid System | Excellent (individual hydration) | Moderate (requires framework) | Vials reusable, framework permanent | Suspended installations, clouds, arches | Low – components reusable except vial caps |
| Traditional Floral Foam | Good short-term | Good for standard stems | Single-use only | Conventional arrangements | High – non-biodegradable, microplastic pollution |
Why a 2m Floral Cloud Weighs 50kg: The Hidden Water Weight Factor?
One of the most underestimated forces in large-scale floral design is water. A floral cloud that seems light and airy when dry can become dangerously heavy once hydrated, and this « wet weight » is what your rigging must support. The mistake is to calculate weight based only on the dry materials. The reality is that water is the heaviest component. Remember the simple conversion: 1 litre of water equals 1 kilogram of weight. A single brick of standard floral foam can go from 0.1kg dry to 2kg when fully saturated, absorbing nearly 2 litres of water. A bunch of salal greenery can almost double in weight from water absorption.
To manage this, professional floral designers use the proven calculation of stems per cubic inch formula: Total stems ÷ (Height × Width × Depth) and a clear weight calculation. The formula is: Final Weight = (Dry Structure Weight) + (Dry Foliage/Flower Weight) + (Total Water Volume in Liters). To reduce this, a « hollow core » design is essential. The structural frame should be as light as possible, with heavy, water-saturated materials concentrated only on the visible exterior shell. Another pro tip is the « drip-dry » factor. After soaking all components, allow the entire structure to drip for at least an hour. It can lose 10-20% of its initial absorbed water weight, giving you a more accurate final rigging weight.
Let’s take a 2-metre cloud as an example. A light wire frame might be 3kg. Add 7.5kg of dry foliage and 16kg for 8 bricks of soaked foam. The water absorbed by the foliage and held in individual stem tubes can easily add another 18kg. The total weight quickly approaches 45kg. This is a significant load that demands the structural engineering checks we discussed earlier. Without accounting for the hidden water weight, you are planning for failure.
Key Takeaways
- Think like a set designer: Focus on creating focal points and using light, not on covering every surface with flowers.
- Foliage and uplighting are your most powerful budget-stretching tools, creating perceived volume and drama for a fraction of the cost.
- Structural safety is non-negotiable. Always calculate the « wet weight » of suspended installations and perform a professional load test.
How to Hang a Floral Cloud From a Venue Ceiling Without Structural Damage?
Once you’ve calculated the true weight of your installation and verified the ceiling’s load capacity, the final step is the physical rigging. This must be done using professional, non-destructive methods that leave the venue in perfect condition. The industry standard is the beam clamp system. These clamps attach securely to a venue’s existing steel I-beams or trusses, providing a rated anchor point without any drilling or permanent modification. For historic venues with inaccessible or delicate ceilings, the solution is a freestanding « counterweight goal post » system, which uses heavy-duty lighting stands to create an independent rigging point above your desired area.
Communication with the venue is paramount. You must submit a one-page rigging plan at least 30 days in advance. This document should include a sketch of the design, the calculated final weight, the hardware you intend to use, and a copy of your rigger’s liability insurance. Speaking of which, there is a clear threshold for hiring a professional. If your installation weighs over 25kg (55 lbs), will be suspended over people, or the venue simply requires it, you must hire a certified rigger. The typical cost of £300-£500 is not an expense; it’s insurance against catastrophic failure. Furthermore, industry safety standards mandate that all riggers must be ETCP certified or have equivalent documented experience.
Finally, every piece of rigging hardware must adhere to a minimum 5:1 safety factor. This means for your 40kg installation, all cables, clamps, and straps must be rated to hold at least 200kg. This professional-grade discipline is what separates a breathtaking garden illusion from a headline-making disaster. It’s the unseen foundation of all spectacular event design.
By shifting your mindset from that of a decorator to a theatrical designer, you unlock a new set of tools. You are no longer limited by the cost per stem, but empowered by the principles of scale, light, and structural integrity. This approach allows you to create a truly immersive and magical garden experience that your guests will remember, all while respecting the financial realities of a charity event. Start planning your next event not by asking « How many flowers can we afford? », but by asking « What illusion do we want to create? ».