The number one reason your hydrangeas turn brown isn’t your drying method—it’s that you’re cutting them at the wrong time.
- Fresh, vibrant summer blooms are full of water and are biochemically programmed to wilt and rot, not dry gracefully.
- The secret is to harvest blooms in late summer or autumn, only after they have matured on the plant and developed a papery texture.
Recommendation: Stop cutting your hydrangeas at their peak summer beauty. Instead, wait for them to enter their ‘antique stage’ on the bush for guaranteed success.
It’s a familiar, frustrating story for many UK gardeners. You snip a perfect, vibrant hydrangea bloom at the height of summer, bring it indoors with visions of everlasting beauty, and a week later you’re left with a sad, brown, papery ghost of the flower it once was. You followed the common advice: you hung it upside down in a dark, airy room, or perhaps you tried the water-drying trick you saw online. Yet, the result is the same—a brittle, colourless disappointment.
The frustration is understandable, but it’s based on a fundamental misunderstanding of the plant. The secret to achieving those coveted, richly coloured antique hydrangea heads has very little to do with the drying method itself. The mistake was likely made the moment you wielded your secateurs. A fresh summer bloom is full of moisture and high in metabolic activity; its biological imperative is to live, not to be preserved. When cut, it simply wilts and decomposes.
But what if the key wasn’t in forcing a young flower to dry, but in cooperating with a mature one that has already begun the process itself? The true art lies in harvesting the bloom at its ‘antique stage’—a point of natural maturity on the stem where its water content has dropped, its petals have firmed up, and its pigments have shifted to deeper, more complex tones. This guide will correct that fundamental misunderstanding. We will move past the simple ‘how-to’ and delve into the horticultural ‘why’, exploring the crucial role of timing, variety selection, and even garden planning to ensure your next attempt results in a stunning, long-lasting display.
This comprehensive guide will walk you through every critical step, from identifying the perfect moment to harvest to advanced preservation and even designing your garden for a continuous supply of beautiful dried materials. Explore the sections below to master the art of hydrangea preservation.
Summary: Why Do Hydrangeas Turn Papery Brown Instead of Drying to a Beautiful Antique Shade?
- Why Cutting Hydrangeas in September Produces Better Dried Blooms Than July?
- Water-Drying or Hanging: Which Method Keeps Hydrangea Petals Most Intact?
- Annabelle, Limelight, or Mophead: Which Hydrangea Variety Dries to the Richest Colour?
- Why Your Blue Hydrangeas Dried Grey: The Soil pH Connection?
- How to Store Dried Hydrangeas for 3 Years Without Dust Damage or Brittleness?
- Silica Gel or Hanging: Which Drying Method Preserves Colour Best?
- Why Oriental Poppies Leave a Gap for 10 Months After Their 2-Week Show?
- How to Create a Perennial Border That Flowers From April to October?
Why Cutting Hydrangeas in September Produces Better Dried Blooms Than July?
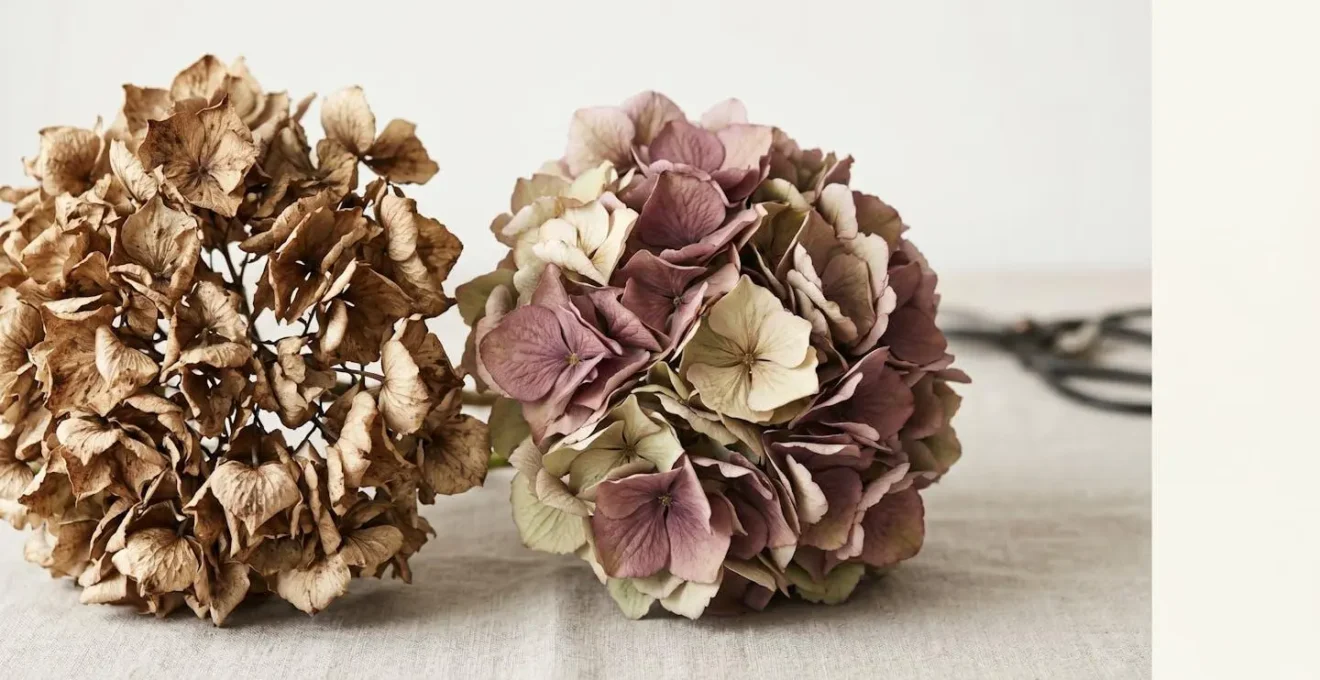
This is the single most important lesson in drying hydrangeas: timing is everything. Cutting a bloom in July, at its peak vibrancy, is a recipe for failure. These flowers are soft, fleshy, and have a high water content. They lack the structural integrity to hold their shape as they dry, causing them to shrivel and turn brown. By September, however, the plant has begun preparing for dormancy. The flowers left on the stem have started a natural dehydration process. Their water content has decreased significantly, the petals feel more leathery or papery to the touch, and the colours have often deepened into muted, vintage shades of mauve, burgundy, and sage green. You are not drying the flower; you are merely finishing the process the plant has already started.
This principle is consistently confirmed by preservation experts. As the team at StoneGable Blog notes, success comes from patience: « Hydrangeas are best harvested for drying when their colors have started to mature and deepen. The petals will feel a little more papery, and the vibrant summer hues will fade to gorgeous vintage tones. » This isn’t just anecdotal; it’s a matter of plant biology. A systematic experiment on harvest timing clearly demonstrated that blooms cut after they had begun to feel papery retained their shape and colour far better than those cut when fresh and soft. Harvesting a mature bloom is the difference between preservation and decomposition.
Your 5-Point ‘Ready-to-Cut’ Hydrangea Audit
- Petal Texture: Gently touch a petal. Does it feel soft and fleshy like a fresh flower, or does it have a slightly firm, papery, or leathery feel? Only cut if it feels papery.
- Colour Check: Look past the initial bright colour. Has it started to fade or take on secondary tones like green, pink, or red mottling? This ‘antique’ look is your signal.
- Sound Test: Lightly flick the flower head with your finger. Do you hear a soft, rustling sound? This indicates lower moisture content and is a positive sign.
- Flexibility: Gently bend a single petal. If it is very flexible and soft, it’s too early. If it has some stiffness and holds its shape, it is ready.
- Stem Check: Examine the main stem below the bloom. Is it still bright green and soft, or has it started to become more woody and firm? A woodier stem is a good indicator of maturity.
Water-Drying or Hanging: Which Method Keeps Hydrangea Petals Most Intact?
Once you have harvested a perfectly mature bloom, you can finally consider the drying method. The two most popular and effective air-drying techniques are hanging them upside down and the ‘water-drying’ method. Neither is universally « better »; the best choice depends on your ambient humidity, the variety of hydrangea, and the final shape you desire. The common mistake is not the method itself, but applying it to an immature flower. With a mature bloom, both methods can yield excellent results.
The hanging method is straightforward: strip the leaves, bundle a few stems together, and hang them upside down in a dark, dry, well-ventilated area for 1-2 weeks. This works best in low-humidity environments and tends to create a slightly more compact, spherical bloom shape. The water-drying method, conversely, is often more successful in the more humid conditions common in the UK. It involves placing the stems in a vase with just an inch or two of water and letting that water evaporate slowly over 2-3 weeks. As the flower slowly dehydrates from the top down while still being able to draw a tiny amount of moisture, it tends to dry in a more open, naturalistic form. This is the key difference: water-drying preserves the upright shape of the bloom.
The following table, based on insights from sources like guides by floral experts, breaks down the key differences to help you choose the right approach for your home and your flowers.
| Method Characteristic | Water-Drying Method | Hanging Method |
|---|---|---|
| Best Climate | Humid environments | Dry climates with low humidity |
| Process | Place stems in vase with 1-2 inches of water, allow to evaporate over 2-3 weeks | Hang stems upside down in dark, well-ventilated space |
| Bloom Shape Result | More open, natural form preserved as flower dries upright | Slightly more compact, denser spherical shape |
| Color Retention | Better preservation of antique tones and complex hues | Faster color fade, more uniform vintage appearance |
| Risk of Failure | Stem rot or mold if water level too high or poor ventilation | Rapid wilting and papery brown results if blooms too immature |
| Time Required | 2-3 weeks | 1-2 weeks |
Annabelle, Limelight, or Mophead: Which Hydrangea Variety Dries to the Richest Colour?
Your success in drying hydrangeas is also heavily influenced by the variety you choose to grow and cut. While it’s technically possible to dry any hydrangea, some are significantly more forgiving and reliable than others. If you’ve been struggling with classic blue or pink Mopheads (Hydrangea macrophylla), you are not alone—they are notoriously the most challenging to dry due to their higher petal moisture content and thinner petal structure. For beginners, shifting focus to other species can be a game-changer.
The easiest and most reliable varieties for drying are the Panicle hydrangeas (Hydrangea paniculata), such as the popular ‘Limelight’, ‘PeeGee’, and their many modern cultivars. Their flowers are sturdier, have naturally lower water content when mature, and their colour transformation on the plant—from white or lime green to shades of dusty rose, mauve, and parchment—is exactly what you’re looking for. Oakleaf hydrangeas (H. quercifolia) are also excellent, drying to deep, rich shades of burgundy and rust. Even within the more challenging categories, some varieties perform better than others. As experts from Southern Living Plants point out, the final dried colour can be a wonderful surprise: « Oakleaf hydrangeas like Tara take on hints of coral or rose, while big-leaf hydrangeas like Dear Dolores pick up hints of purple, burgundy or aqua, depending on location and soil pH. »
To guide your selection, whether in the garden or at the florist, the following chart provides a relative rating for drying success among common hydrangea types. Focusing on varieties with a high ‘Ease of Drying’ score will dramatically increase your chances of success.
| Variety (Species) | Ease of Drying (1-5) | Color Transformation | Brittleness (1-5) | Best For |
|---|---|---|---|---|
| Limelight (Paniculata) | 5 – Easiest | Lime green → creamy white → dusty rose/mauve | 2 – Low brittleness | Beginners, large arrangements |
| PeeGee (Paniculata ‘Grandiflora’) | 5 – Easiest | White → pink → antique bronze | 2 – Low brittleness | Classic dried look, wreaths |
| Oakleaf (Quercifolia) | 4 – Easy | White → pink → deep burgundy/rust | 2 – Low brittleness | Premium color, fall arrangements |
| Annabelle (Arborescens) | 3 – Moderate | White/green → creamy parchment | 4 – More delicate | Delicate vintage aesthetic |
| Mophead (Macrophylla) | 2 – Challenging | Blue/pink → violet/green/smoky tones (variable) | 4 – More brittle | Advanced users, special occasions |
Why Your Blue Hydrangeas Dried Grey: The Soil pH Connection?
The disappointment of a vibrant blue Mophead hydrangea fading to a dull, smoky grey is a specific and common problem. This colour failure is not random; it’s a matter of chemistry that begins in your garden soil long before you make the cut. The blue pigment in hydrangeas, called delphinidin, is only produced and remains stable in the presence of available aluminium ions in the soil. The plant’s ability to absorb this aluminium is directly controlled by the soil’s acidity (pH).
For a hydrangea to be truly blue, it needs acidic soil. Expert research shows that maintaining a soil pH below 6.5 is necessary, with the most vibrant blues appearing in a very specific range of pH 5.2-5.5. If your soil is neutral or alkaline (pH 7.0 or higher), the aluminium becomes locked up and unavailable to the plant, causing the flowers to turn pink. If the pH is in a borderline range, or if the flower is cut and dried, the delicate chemical complex that creates the blue colour can become unstable. Without the continuous uptake of acidic water from the plant’s vascular system, the pigment can degrade, resulting in those muddy, greyish-purple tones. This is why pink hydrangeas often dry to a more stable, attractive antique rose colour, while blue ones are far more temperamental.
Therefore, to successfully dry a blue hydrangea, you must first be successful in growing a *stably* blue hydrangea. This involves regular soil testing and amending with soil acidifiers or aluminium sulphate throughout the growing season. When you do harvest a mature blue bloom, using the water-drying method can sometimes help preserve the colour for longer by slowing the dehydration process. However, be prepared that some colour shift is almost inevitable with this notoriously fickle shade.
How to Store Dried Hydrangeas for 3 Years Without Dust Damage or Brittleness?
Once you’ve successfully dried your hydrangeas, the next challenge is preserving them for the long term. The two main enemies of dried flowers are dust and brittleness, which leads to shattering. While a light coat of an artist’s matte fixative or a specific dried flower spray can help reduce moisture absorption and seal the petals, a more advanced technique can render them supple and far more durable: glycerin preservation. This method effectively replaces the water in the plant’s cells with glycerin, a humectant that remains soft and flexible.
This process is best done with mature, but not fully dried, stems. The glycerin solution is absorbed through the stem just as water would be, infusing the entire bloom. The result is a flower that feels surprisingly pliable and is significantly less prone to shattering. It can be a transformative technique for creating arrangements that need to withstand occasional handling or last for many years. It also makes dusting much easier, as you can use a soft brush or gentle canned air without fear of the petals disintegrating. Note that glycerin can sometimes deepen the flower’s colour to richer, more muted tones, which is often a desirable effect.
For those looking to create truly heirloom-quality dried arrangements, mastering the glycerin preservation method is a worthy investment of time. Follow these steps carefully for the best results.
Glycerin Preservation Method for Long-Term Flexibility
- Step 1: Mix one part glycerin with two parts warm water to create the preservation solution.
- Step 2: Make fresh angled cuts on dried hydrangea stems and place them in the glycerin solution, ensuring 2-3 inches of stem are submerged.
- Step 3: Allow stems to absorb the solution for 3-6 weeks in a cool, dark location. The glycerin replaces water in plant cells.
- Step 4: Remove stems when solution level has dropped significantly and petals feel supple rather than brittle.
- Step 5: Gently shake off excess solution and allow blooms to air dry for 24 hours before displaying or storing.
Silica Gel or Hanging: Which Drying Method Preserves Colour Best?
When the primary goal is to preserve the most vibrant, life-like colour possible, we must introduce a third drying method: silica gel. This is a completely different approach from air-drying (hanging or water-drying). While air-drying coaxes out a muted, ‘antique’ palette by allowing a slow, natural transformation, silica gel works by rapid desiccation. The fine, sandy crystals absorb moisture from the petals extremely quickly, locking in the colours as they were at the moment of cutting. This is the method to use if you want to preserve the bright pinks, vibrant blues, or pure whites of a less mature bloom.
The trade-off for this colour preservation is in texture, time, and scale. According to preservation experts, the process is fast, often taking only 2-4 days. However, the resulting flowers are often more brittle and can feel less natural than air-dried blooms. The process is also labour-intensive; each flower head must be carefully buried in the gel in a large, airtight container. This makes silica gel ideal for preserving a few prize blooms for a special occasion or a craft project, like a shadow box, but impractical for drying large quantities for a wreath or a large vase arrangement. Therefore, the « best » method for colour depends entirely on the colour you wish to achieve: air-dry for antique tones, and use silica for ‘fresh’ colours.
| Factor | Silica Gel Method | Hanging/Air-Drying Method |
|---|---|---|
| Drying Speed | Fast: 2-4 days for complete dehydration | Slow: 1-3 weeks depending on humidity |
| Color Result | Preserves ‘living’ bright colors (pinks, blues, whites at peak) | Creates ‘antique’ palette (dusty rose, mauve, parchment, bronze-green) |
| Final Texture | More brittle, less natural feel | More natural, slightly softer texture |
| Bloom Shape | Can compress petals if not carefully buried | Maintains natural form with gentle compacting |
| Best Application | Few prize blooms for shadow boxes, crafts, keepsakes | Large quantities for wreaths, garlands, bulk arrangements |
| Cost & Accessibility | Requires purchasing silica gel; reusable but initial investment | Free method using existing household items |
Why Oriental Poppies Leave a Gap for 10 Months After Their 2-Week Show?
As a horticulturist, I firmly believe that understanding a plant’s entire lifecycle is the key to both a beautiful garden and successful preservation. While seemingly off-topic, the case of the Oriental Poppy offers a powerful parallel lesson in planning and patience. Poppies are ‘ephemeral perennials’; they put on a spectacular, but brief, two-week show in late spring, then their foliage dies back completely, leaving a noticeable gap in the border for the rest of the year. A gardener who doesn’t anticipate this will be left with a bare patch from June until the following spring. This is analogous to the hydrangea cutter who, focused only on the peak bloom, fails to anticipate the need for maturity.
The expert gardener learns to plant around this dormancy. This is a lesson in temporal design and seeing the garden as a four-dimensional space. The solution to the poppy gap is companion planting. By interplanting them with ‘living mulch’—spreading, shallow-rooted perennials like Geranium ‘Rozanne’ or Alchemilla mollis—the gap is seamlessly filled. These companions grow up and over the dormant poppy crowns, providing colour and texture throughout the summer and autumn. This strategy of planning for a plant’s ‘disappearance’ is an advanced horticultural concept. It teaches us to think about a plant’s contribution to the garden across all seasons, not just at its moment of peak glory. This includes its afterlife; the architectural seed pods of those same poppies can be harvested in autumn and used alongside your dried hydrangeas in arrangements, providing another form of lasting beauty.
Case Study: Companion Planting for Ephemeral Perennials
Garden designers have successfully addressed the dormancy gap left by ephemeral bloomers like Oriental poppies by implementing a ‘living mulch’ strategy. By interplanting shallow-rooted, spreading perennials such as hardy geraniums (Geranium ‘Rozanne’) or lady’s mantle (Alchemilla mollis) around the poppy crowns, the visual gap is filled during summer dormancy. These companion plants grow over the dormant area from June through September, providing continuous color and texture, then naturally recede in late fall, allowing poppies to re-emerge in early spring without competition.
Key Takeaways
- Harvest timing is the single most critical factor; only cut mature, papery blooms in late summer or autumn.
- Panicle hydrangeas (e.g., ‘Limelight’) are the easiest and most reliable varieties for beginners to dry successfully.
- The water-drying method is excellent for humid UK climates and helps blooms maintain a more natural, open shape.
How to Create a Perennial Border That Flowers From April to October?
Let us now elevate our thinking from preserving a single flower to designing an entire garden with year-round beauty and preservation in mind. A truly sophisticated perennial border is not just a riot of summer colour, but a carefully choreographed performance that offers interest from spring to winter. More importantly for our purposes, it can be designed as a living larder for your dried flower arrangements. This involves selecting plants not just for their fleeting flowers, but for the structure, texture, and form they hold after their colour has faded. This is where hydrangeas, particularly H. paniculata, become star players, holding their form beautifully in the garden long into winter.
The key to continuous display is a technique called ‘matrix planting’. You begin by choosing a ‘matrix’ plant—often a low-growing ornamental grass or a tough groundcover—and planting it repeatedly throughout the bed. This creates a unifying, textured base layer. Into this matrix, you then plant your ‘spotlight’ perennials with staggered bloom times: early bulbs, spring poppies, summer echinaceas and hydrangeas, and autumn asters. Many of these, like Echinacea (coneflower), Eryngium (sea holly), and various grasses, have seed heads or plumes that dry beautifully right on the plant, ready for harvesting alongside your hydrangeas in the autumn. You are essentially curating a ‘dried bouquet’ in place, ready to be gathered.
This approach transforms the garden from a purely ephemeral pleasure into a sustainable source of indoor decor. It connects the life of the garden to the life of the home, embodying the ultimate expression of a gardener’s skill.
Matrix Planting for a ‘Dried Bouquet’ Border
- Step 1: Choose a ‘matrix’ plant with year-round texture (ornamental grasses like Carex or Pennisetum, or ground covers).
- Step 2: Plant the matrix at regular intervals throughout the border (every 18-24 inches) to create a unifying base layer.
- Step 3: Intersperse ‘spotlight’ perennials with staggered bloom times among the matrix (spring: poppies; summer: hydrangeas, echinacea; fall: asters).
- Step 4: Include plants with dried-in-place structure for winter interest (hydrangea paniculata, echinacea seed heads, ornamental grasses).
- Step 5: Layer by height: matrix and ground-layer plants 12-18 inches, mid-height bloomers 24-36 inches, tall architectural plants 4-6 feet at back.
Armed with a deeper understanding of the hydrangea’s lifecycle and the importance of maturity, your next attempt at drying is destined for success. The papery brown failures of the past were not a reflection of your skill, but simply a result of mistimed enthusiasm. This autumn, go out into your garden not with haste, but with the patient eye of a seasoned expert. Look for those subtle shifts in colour and feel for that tell-tale papery texture. By cooperating with nature instead of fighting it, you will finally create the stunning, everlasting hydrangea displays you’ve always envisioned.