The vibrant colour of professionally preserved flowers stems from halting cellular decay with science, a process simple DIY drying cannot replicate.
- DIY air-drying is too slow, allowing enzymes to cause browning and structural collapse in delicate flowers.
- Professional preservation uses techniques like glycerine replacement to maintain cellular integrity, keeping stems flexible and petals soft for years.
Recommendation: To achieve long-lasting results, understand the specific cellular structure of each flower and choose a preservation method that actively combats decay rather than just removing water.
There is a unique disappointment every crafter and home decorator knows well. You carefully select the most beautiful fresh blooms, hang them diligently in a dark, dry corner, and wait. At first, they seem perfect. But within weeks or months, the vibrant petals fade to a sad, muted brown, becoming brittle and fragile. You look at the eternally vibrant, flexible preserved bouquets in high-end stores and wonder: what is their secret? Why do your DIY-dried flowers fail while theirs seem to last forever?
The common advice—use silica gel, keep them out of the sun, choose the right flowers—only scratches the surface. These tips are not wrong, but they fail to explain the fundamental difference between simply drying a flower and truly preserving it. The answer doesn’t lie in a simple trick, but in a deep understanding of botany and chemistry. It’s about working with the flower at a cellular level to halt the natural process of decay, something home methods can only crudely imitate.
The distinction is not magic; it’s science. It’s the difference between arresting enzymatic browning before it starts and letting it run its course. It’s about understanding which flowers possess the inherent structural integrity to survive the process and which are destined to collapse. This article will deconstruct the science, moving beyond simplistic DIY tips to reveal the technical and artistic processes that define professional floral preservation.
Contents: Unlocking the Science of Floral Preservation
- Silica Gel or Hanging: Which Drying Method Preserves Colour Best?
- Why Roses Preserve Beautifully but Tulips Collapse: The Cell-Structure Explanation
- DIY Pressed Leaves or Glycerine-Preserved Greenery: Which Stays Flexible for Years?
- Why Preserved Flower Walls Fade in 6 Months Near Windows: The UV Protection Guide
- How Long Do Preserved Flower Walls Last in High-Traffic Commercial Environments?
- Natural Beige or Bleached White Pampas: Which Suits a Minimalist Interior?
- Annabelle, Limelight, or Mophead: Which Hydrangea Variety Dries to the Richest Colour?
- Why Does Pampas Grass Shed Fluff All Over Your Home After Purchase?
Silica Gel or Hanging: Which Drying Method Preserves Colour Best?
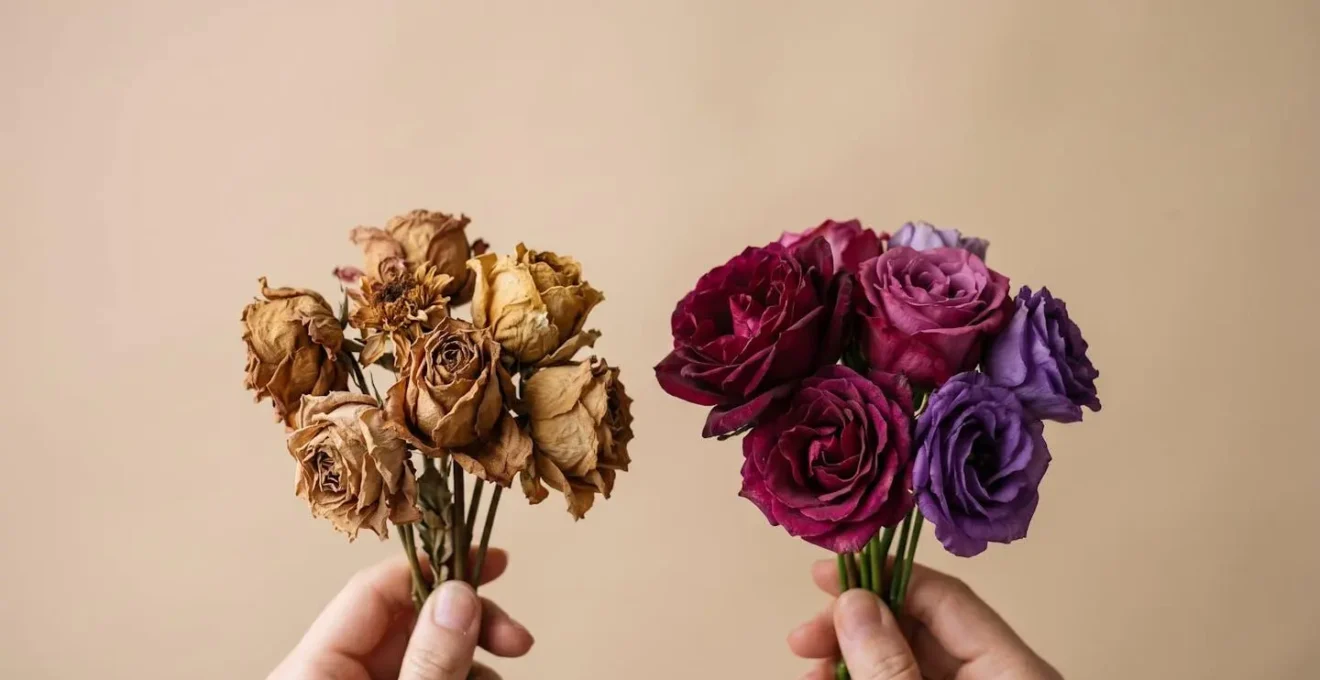
The most common reason DIY-dried flowers turn brown is a process called enzymatic browning. When a flower is cut, its cells begin to break down, releasing enzymes that react with oxygen and other elements, causing the pigments to degrade into brown and black tones. The traditional method of air-drying by hanging flowers upside down is a slow process. This extended timeframe gives these destructive enzymes ample opportunity to do their work, resulting in significant colour loss and the familiar muted, brownish look.
This is where professional methods diverge sharply. The goal is speed. Silica gel, a desiccant that looks like sand, is a cornerstone of professional drying precisely because it is so fast. By rapidly pulling moisture from the petals, it dehydrates the flower before the browning enzymes can activate. In fact, research confirms that silica gel is the fastest-acting drying agent available and plant materials dried in it retain good color. It effectively ‘freezes’ the flower in its vibrant state by arresting the process of decay.
While air-drying is romantic and simple, it is fundamentally a race against cellular decay that it almost always loses. For preserving true, vibrant colour, the rapid dehydration offered by silica gel is vastly superior because it directly counters the chemical reactions that lead to browning. It’s not just about removing water; it’s about doing it quickly enough to outpace nature’s decomposition process.
Why Roses Preserve Beautifully but Tulips Collapse: The Cell-Structure Explanation
Have you ever tried to dry a beautiful tulip, only to watch it shrivel into a papery, unrecognisable husk? The reason for this failure lies in the flower’s invisible architecture: its cellular structure. Flowers are not created equal. Some, like roses, have a high content of lignin—a complex polymer that makes cell walls rigid and woody. This gives them a strong ‘cellular scaffold’ that maintains its shape even as moisture is removed.
In contrast, flowers like tulips, daffodils, and amaryllis have a very high water content and very little lignin. Their structure is primarily supported by turgor pressure (the water inside their cells pushing outwards). Once this water is removed during the drying process, their cellular scaffold is too weak to support itself, leading to inevitable collapse. It is a botanical reality that flowers with a moist or thick stem are less ideal for drying, while flowers with a firm, woody stem lend themselves best to drying. This isn’t a failure of your technique; it’s a limitation of the plant’s biology.
Case Study: The Inevitable Collapse of the Tulip
Professional florists have extensively documented this phenomenon. When drying, tulips contain too much moisture and often shrivel as they dry, making them unsuitable candidates for preservation. Their petals lack the structural integrity to withstand the dehydration process. Roses, on the other hand, with their comparatively lower petal moisture and firm, woody stems, maintain their iconic shape beautifully throughout drying, making them a preferred choice for professional preservation work.
So, the success of preservation begins with selection. A professional preserver isn’t just choosing a flower for its beauty, but for its inherent structural integrity. They are selecting a canvas that is biologically suited to withstand the rigours of the process, a crucial factor that is often overlooked in DIY attempts.
DIY Pressed Leaves or Glycerine-Preserved Greenery: Which Stays Flexible for Years?
When it comes to greenery like eucalyptus, the difference between DIY and professional results is most apparent in the texture. Pressing or air-drying leaves removes the water, which inevitably leads to a brittle, fragile state. The leaves may retain their shape for a time, but they lose all their natural suppleness. This is because drying is a process of simple subtraction (removing water), while true preservation is a process of substrate replacement.
Professional preservation of greenery often employs a glycerine-based solution. Glycerine is a hygroscopic substance, meaning it attracts and holds water molecules. When a stem is placed in a glycerine and water solution, the plant’s natural vascular system draws it up. The glycerine molecules gradually replace the water molecules within the plant’s cells. Because glycerine is a much larger, more stable molecule than water, it keeps the cells plump and flexible, preventing them from collapsing and becoming brittle.
Case Study: The Supple Preservation of Eucalyptus
The glycerine method is a cornerstone of professional foliage preservation. Florists create a mixture of one part vegetable glycerine to two parts hot water. Stems like eucalyptus are then left to absorb this solution for several days or weeks. As a result, the eucalyptus dries especially beautifully with the glycerin method—it stays flexible and keeps its color. This demonstrates how replacing the cellular water with glycerine maintains pliability, a quality that is completely lost through simple air-drying.
This technique results in greenery that not only looks lifelike but feels soft and remains pliable for years. It’s a far more intricate process than simply pressing a leaf in a book, but it’s this cellular-level replacement that explains why professionally preserved foliage can be handled and arranged without shattering, while its DIY counterparts crumble at the slightest touch. According to specialists, professionally preserved flowers with the correct care can last more than 1 year, even up to 3 years, a lifespan directly attributable to these advanced techniques.
Why Preserved Flower Walls Fade in 6 Months Near Windows: The UV Protection Guide
Even the most perfectly preserved flower is not invincible. Its greatest enemy is invisible: ultraviolet (UV) light. The vibrant pigments in flower petals are complex organic molecules. When exposed to the high-energy radiation of UV light—abundant in direct sunlight—these molecules begin to break down in a process called photodegradation. This is why a stunning preserved flower wall installed near a sunny window can show noticeable fading in a matter of months.
The effect is not uniform and depends on the pigment. Lighter colours like whites and pale pinks have less stable pigments and can fade quickly. More intense colours, like deep reds and blues, tend to be more resilient but are by no means immune. The change can be alarmingly fast; preservation tracking has shown that Coral and peach garden roses can lose all color within eight months when exposed to significant light. This isn’t a flaw in the preservation itself, but a fundamental chemical reaction.
As professional preservers, our duty extends to educating clients on proper placement. We treat preserved floral art like any other fine art: it should never be placed in direct sunlight. The ideal location is a spot with indirect natural light or consistent artificial light. For commercial installations where a sunny spot is unavoidable, we insist on the use of UV-protective glass or films on windows. These products are incredibly effective, and can block up to 99% of the light that causes fading, dramatically extending the life of the installation.
How Long Do Preserved Flower Walls Last in High-Traffic Commercial Environments?
A common question from commercial clients, from hotels to retail stores, is about the true longevity and durability of a large-scale preserved installation. The answer depends on three factors: the quality of the preservation, the environment, and the maintenance schedule. In a controlled commercial space away from direct sunlight and high humidity, the lifespan is remarkable. Based on long-term observation, a realistic timeline can be established.
Generally, for the first year, the installation will look almost exactly as it did on day one. From years two to three, darker colours will remain strong, while lighter shades may begin to show some subtle softening or shift in tone. According to multi-year preservation studies, it’s at five years and beyond that lighter tones fade noticeably, while the overall structure remains intact. The primary factor in high-traffic areas isn’t physical damage, but the slow accumulation of dust and exposure to environmental fluctuations.
Unlike fresh flowers, preserved arrangements are low-maintenance, but not zero-maintenance. A professional maintenance schedule is crucial for maximising the investment. This involves gentle, periodic cleaning to remove dust that can dull the colours and attract moisture. It is vital to avoid any physical contact, moisture, or harsh chemicals. Proper care is gentle and focuses on air movement and careful brushing.
Your Professional Maintenance Checklist: Preserving the Investment
- Gentle Dusting: Use a hairdryer on a cool, low setting or a can of compressed air from a safe distance (at least 25cm) to gently blow away dust. Never touch the delicate petals directly.
- Detailed Cleaning: For stubborn or hard-to-reach dust, use a very soft, clean makeup brush or artist’s paintbrush to gently flick particles away.
- Airflow Management: Avoid placing installations directly under strong air conditioning vents. Prolonged, direct airflow can cause petals to become overly dry and crack over time.
- Humidity Control: If discoloration due to humidity occurs (a sign of levels above 50-60%), place a desiccant pack nearby. In severe cases, a professional may need to assess the piece.
- Monitor the Environment: Keep humidity levels consistently below 50% to prevent the glycerine and colouring solution from ‘bleeding’ or causing discoloration, which is the most common humidity-related issue.
Natural Beige or Bleached White Pampas: Which Suits a Minimalist Interior?
Pampas grass has become a defining element of modern minimalist decor, but the choice between its natural beige and bleached white forms can dramatically alter the feel of a space. This decision is less about preservation longevity—as a robust grass, pampas is incredibly durable—and more about aesthetic intent and the specific atmosphere you wish to cultivate in your home.
Natural Beige Pampas Grass brings warmth, texture, and a connection to nature. Its tones range from sandy beige to soft taupe and golden wheat. In a minimalist interior, it serves as a soft counterpoint to hard lines and neutral palettes. It excels in styles like:
- Bohemian & Scandinavian: Where it complements natural wood, woven textiles, and a cosy, layered aesthetic.
- Warm Minimalism: Where it adds a touch of organic softness to a palette of cream, terracotta, and muted earth tones, preventing the space from feeling sterile.
Bleached White Pampas Grass is a more stylised, architectural choice. The bleaching process removes all natural colour, resulting in a stark, sculptural form. This makes it a statement piece that reads as pure form and texture. It is perfectly suited for:
- Modern & Architectural Minimalism: Where its clean, graphic lines complement concrete floors, metal accents, and a monochromatic colour scheme.
- High-Contrast Interiors: Placed against a dark grey or black wall, bleached pampas creates a dramatic visual impact that is both elegant and bold.
Professionals note that with proper care, dried flowers last 1–3 years, but pampas grass and strawflowers last even longer, making either choice a lasting investment. Ultimately, the decision rests on the feeling you want to evoke. Choose natural beige for a soft, earthy, and inviting warmth, or opt for bleached white for a bold, modern, and sculptural statement.
Annabelle, Limelight, or Mophead: Which Hydrangea Variety Dries to the Richest Colour?
Hydrangeas are a favourite for drying, but not all varieties yield the same results. The secret to achieving those rich, antique colours doesn’t just lie in the variety, but in the timing. The most common mistake is cutting them at their peak fresh beauty, when they are full of moisture and their pigments are not yet stable. Professionals know to wait.
The best time to harvest hydrangeas for drying is near the end of their natural growing season. You must wait until the blooms begin to change colour on the plant itself and the petals start to feel slightly papery to the touch. This indicates that the flower has naturally begun its own preservation process, reducing its moisture content while the pigments intensify and set. This is a critical insight for any aspiring preserver.
Case Study: The Papery Texture Test
As documented by seasoned growers, the key is to wait for the colour to mature. The petals will start to feel papery—this is when it’s the optimal time to cut and dry the hydrangeas. This papery texture signals that the flower’s moisture content has naturally decreased, making it a perfect candidate for drying with minimal risk of wilting or moulding. Cutting too early, when petals are soft, is the primary cause of drying failure.
Regarding varieties, those with tougher, more robust petals tend to perform best.
- ‘Limelight’ and ‘Annabelle’ Hydrangeas: These are often considered superior for drying. Their petals are naturally thicker and more resilient. When left on the plant to mature, they transition from white or green to beautiful shades of dusty pink, burgundy, and antique green, colours that hold exceptionally well when dried.
- ‘Mophead’ Hydrangeas: Traditional blue and pink mopheads can be dried, but their petals are more delicate. Success is highly dependent on catching them at that perfect papery stage. If cut too soon, they will wilt dramatically.
For the richest, most reliable colour, choose a sturdy variety like ‘Limelight’ and have the patience to wait until it tells you it’s ready through its texture.
Key Takeaways
- Speed Halts Decay: The browning of DIY flowers is caused by slow-acting enzymes. Professional methods like silica gel drying are effective because they remove moisture rapidly, arresting this decay process before it begins.
- Structure is Non-Negotiable: A flower’s ability to be preserved depends on its internal ‘scaffold’ of lignin. Woody, structured flowers (like roses) preserve well; watery, soft flowers (like tulips) will collapse.
- Preservation is Replacement: True flexibility in preserved greenery comes from replacing the water in the plant’s cells with glycerine, not just from removing the water, which leads to brittleness.
Why Does Pampas Grass Shed Fluff All Over Your Home After Purchase?
That iconic, fluffy pampas grass plume is, in botanical terms, a flower head laden with seeds. The ‘fluff’ that sheds all over your home is simply the plant’s natural mechanism for seed dispersal. When the plumes are dried, the delicate structures holding these seeds become fragile. Any vibration, breeze, or touch can cause them to release, creating a constant, downy mess.
Many online guides suggest a quick fix: a heavy coating of aerosol hairspray. While this can temporarily ‘glue’ the seeds in place, it is a flawed, amateur solution. Hairspray is sticky, attracts dust over time, can yellow, and creates a stiff, unnatural-looking texture. It solves one problem while creating several others. As studio professionals, we would never use a cosmetic product on a botanical element.
The professional approach is more nuanced. First, upon receiving dried pampas, it should be taken outside and shaken gently but thoroughly to remove any loose seeds that are already detached. This ‘pre-shedding’ step gets rid of the majority of the problem at the source. Secondly, instead of a heavy hairspray, a very light mist of a professional floral fixative or a high-quality matte spray sealant is used. These products are designed to be lightweight, non-yellowing, and provide a flexible hold without a sticky residue. The goal is not to encase the plume in a hard shell, but to provide just enough stability to prevent the seeds from detaching with minor disturbances.
Now that you understand the science behind long-lasting botanicals, you can approach your next project with the eye of a professional, ensuring the beauty you create is designed to endure.